
|
A Discrete-Event Network Simulator
|
Models |
|
|
A Discrete-Event Network Simulator
|
Models |
Animation is an important tool for network simulation. While ns-3 does not contain a default graphical animation tool, we currently have two ways to provide animation, namely using the PyViz method or the NetAnim method. The PyViz method is described in http://www.nsnam.org/wiki/PyViz.
We will describe the NetAnim method briefly here.
NetAnim is a standalone, Qt4-based software executable that uses a trace file generated during an ns-3 simulation to display the topology and animate the packet flow between nodes.
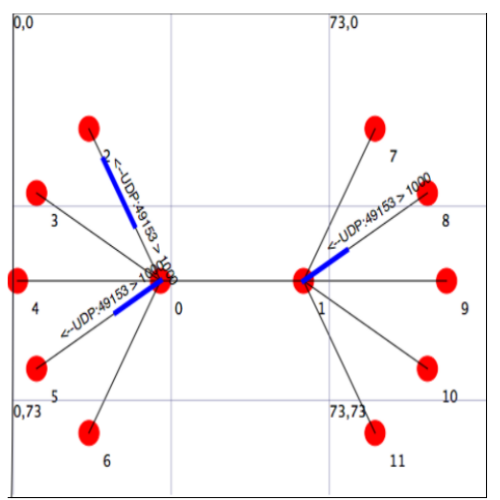
An example of packet animation on wired-links
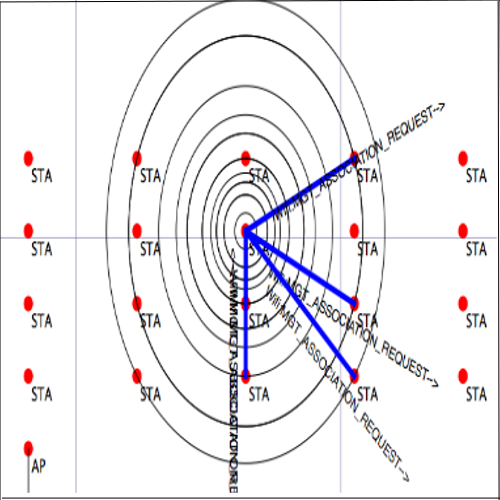
An example of packet animation on wireless-links
In addition, NetAnim also provides useful features such as tables to display meta-data of packets like the image below

An example of tables for packet meta-data with protocol filters
and a way to visualize the trajectory of a mobile node
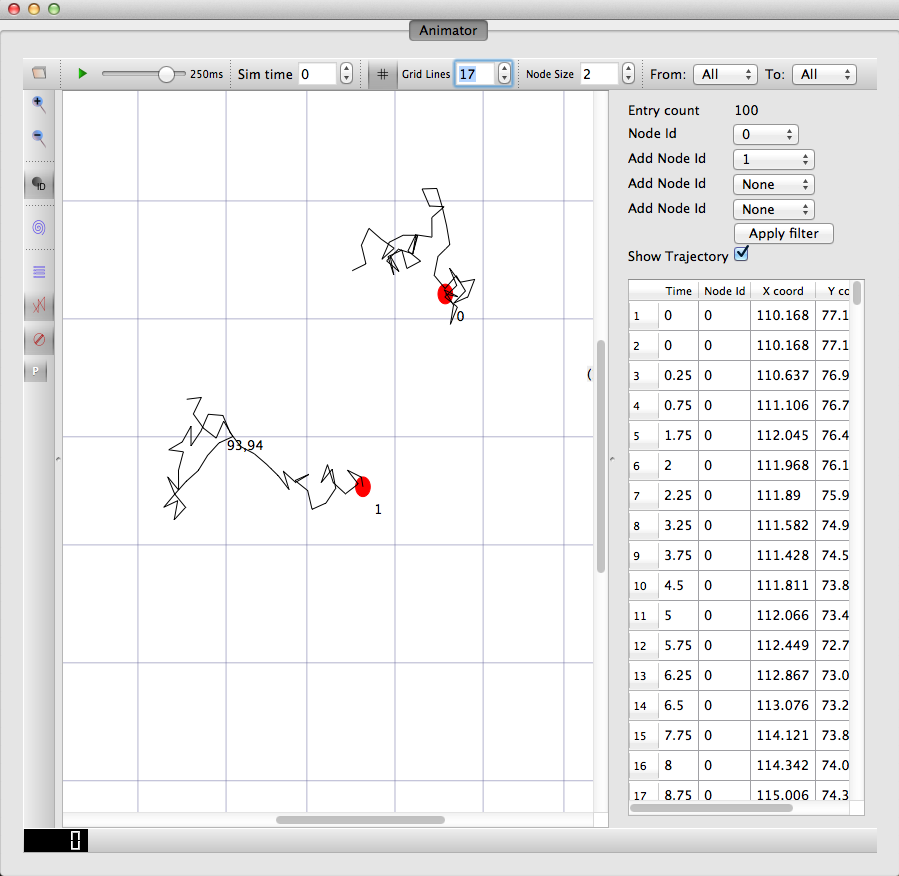
An example of the trajectory of a mobile node
The class ns3::AnimationInterface is responsible for the creation the trace XML file. AnimationInterface uses the tracing infrastructure to track packet flows between nodes. AnimationInterface registers itself as a trace hook for tx and rx events before the simulation begins. When a packet is scheduled for transmission or reception, the corresponding tx and rx trace hooks in AnimationInterface are called. When the rx hooks are called, AnimationInterface will be aware of the two endpoints between which a packet has flowed, and adds this information to the trace file, in XML format along with the corresponding tx and rx timestamps. The XML format will be discussed in a later section. It is important to note that AnimationInterface records a packet only if the rx trace hooks are called. Every tx event must be matched by an rx event.
If NetAnim is not already available in the ns-3 package you downloaded, you can do the following:
Please ensure that you have installed mercurial. The latest version of NetAnim can be downloaded using mercurial with the following command:
$ hg clone http://code.nsnam.org/netanim
Qt4 (4.7 and over) is required to build NetAnim. This can be obtained using the following ways:
For Debian/Ubuntu Linux distributions:
$ apt-get install qt4-dev-tools
For Red Hat/Fedora based distribution:
$ yum install qt4
$ yum install qt4-devel
For Mac/OSX, see http://qt.nokia.com/downloads/
To build NetAnim use the following commands:
$ cd netanim
$ make clean
$ qmake NetAnim.pro  (For MAC Users: qmake -spec macx-g++ NetAnim.pro)
$ make
Note: qmake could be “qmake-qt4” in some systems
This should create an executable named “NetAnim” in the same directory:
 $ ls -l NetAnim
-rwxr-xr-x 1 john john 390395 2012-05-22 08:32 NetAnim
Using NetAnim is a two-step process
Step 1:Generate the animation XML trace file during simulation using “ns3::AnimationInterface” in the ns-3 code base.
Step 2:Load the XML trace file generated in Step 1 with the offline Qt4-based animator named NetAnim.
The class “AnimationInterface” under “src/netanim” uses underlying ns-3 trace sources to construct a timestamped ASCII file in XML format.
Examples are found under src/netanim/examples Example:
$ ./waf -d debug configure --enable-examples
$ ./waf --run "dumbbell-animation"
The above will create an XML file dumbbell-animation.xml
AnimationInterface anim ("animation.xml"); // where "animation.xml" is any arbitrary filename
[for versions before ns-3.13 you also have to use the line “anim.SetXMLOutput() to set the XML mode and also use anim.StartAnimation();]
The following are optional but useful steps:
// Step 1
anim.SetMobilityPollInterval (Seconds (1));
AnimationInterface records the position of all nodes every 250 ms by default. The statement above sets the periodic interval at which AnimationInterface records the position of all nodes. If the nodes are expected to move very little, it is useful to set a high mobility poll interval to avoid large XML files.
// Step 2
anim.SetConstantPosition (Ptr< Node > n, double x, double y);
AnimationInterface requires that the position of all nodes be set. In ns-3 this is done by setting an associated MobilityModel. “SetConstantPosition” is a quick way to set the x-y coordinates of a node which is stationary.
// Step 3
anim.SetStartTime (Seconds(150)); and anim.SetStopTime (Seconds(150));
AnimationInterface can generate large XML files. The above statements restricts the window between which AnimationInterface does tracing. Restricting the window serves to focus only on relevant portions of the simulation and creating manageably small XML files
// Step 4
AnimationInterface anim ("animation.xml", 50000);
Using the above constructor ensures that each animation XML trace file has only 50000 packets. For example, if AnimationInterface captures 150000 packets, using the above constructor splits the capture into 3 files
// Step 5
anim.EnablePacketMetadata (true);
With the above statement, AnimationInterface records the meta-data of each packet in the xml trace file. Metadata can be used by NetAnim to provide better statistics and filter, along with providing some brief information about the packet such as TCP sequence number or source & destination IP address during packet animation.
CAUTION: Enabling this feature will result in larger XML trace files. Please do NOT enable this feature when using Wimax links.
Here is a video illustrating this http://www.youtube.com/watch?v=tz_hUuNwFDs

The persist combobox
When packets are transmitted and received very quickly, they can be almost invisible. The persist time setting allows the user to control the duration for which a packet should be visible on the animation canvas.

The update-interval slider
The update-interval slider controls the rate at which NetAnim refreshes the canvas screen. For instance, for the setting above, NetAnim, updates the position of nodes and packets only once in 250 ms.
The XML trace files has the following main sections
Nodes are identified by their unique Node id. The XML begins with the “information” element describing the rest of the elements
Attributes are:
lp = Logical Processor Id (Used for distributed simulations only)
Attributes are:
minX = minimum X coordinate of the animation canvas
minY = minimum Y coordinate of the animation canvas
maxX = maximum X coordinate of the animation canvas
maxY = maximum Y coordinate of the animation canvas
Example:
<topology minX = "-6.42025" minY = "-6.48444" maxX = "186.187" maxY = "188.049">
Attributes are:
id = Node Id
locX = X coordinate
locY = Y coordinate
Example:
<node id = "8" locX = "107.599" locY = "96.9366" />
Attributes are:
fromId = From Node Id (first node id)
toId   = To Node Id (second node id)
Example:
<link fromId="0" toId="1"/>
This element describes a packet over wired links being transmitted at some node and received at another.
Attributes are:
fId = Node Id transmitting the packet
fbTx = First bit transmit time of the packet
lbTx = Last bit transmit time of the packet
toId = Node Id receiving the packet
fbRx = First bit Reception Time of the packet
lbRx = Last bit Reception Time of the packet
Example:
<p fId="1" fbTx="1" lbTx="1.000067199" tId="0" fbRx="1.002" lbRx="1.002067199"/>
A packet over wired-links from Node 1 was received at Node 0. The first bit of the packet was transmitted at the 1st second, the last bit was transmitted at the 1.000067199th second of the simulation Node 0 received the first bit of the packet at the 1.002th second and the last bit of the packet at the 1.002067199th second of the simulation NOTE: A packet with fromId == toId is a dummy packet used internally by the AnimationInterface. Please ignore this packet
This element describes a packet over wireless links being transmitted at some node and received at another.
Attributes are:
fromId = Node Id transmitting the packet
fbTx = First bit transmit time of the packet
lbTx = Last bit transmit time of the packet
range = Range of the transmission
Example:
<wp fId = "20" fbTx = "0.003" lbTx = "0.003254" range = "59.68176982" tId="32" fbRx="0.003000198" lbRx="0.003254198"/>
A packet over wireless-links from Node 20 was received at Node 32. The first bit of the packet was transmitted at the 0.003th second, the last bit was transmitted at the 0.003254 second of the simulation Node 0 received the first bit of the packet at the 0.003000198 second and the last bit of the packet at the 0.003254198 second of the simulation
For detailed instructions on installing “NetAnim”, F.A.Qs and loading the XML trace file (mentioned earlier) using NetAnim please refer: http://www.nsnam.org/wiki/NetAnim