
|
A Discrete-Event Network Simulator
|
Models |
|
|
A Discrete-Event Network Simulator
|
Models |
ns-3 nodes can contain a collection of NetDevice objects, much like an actual computer contains separate interface cards for Ethernet, Wifi, Bluetooth, etc. This chapter describes the ns-3 WifiNetDevice and related models. By adding WifiNetDevice objects to ns-3 nodes, one can create models of 802.11-based infrastructure and ad hoc networks.
The WifiNetDevice models a wireless network interface controller based on the IEEE 802.11 standard [ieee80211]. We will go into more detail below but in brief, ns-3 provides models for these aspects of 802.11:
The set of 802.11 models provided in ns-3 attempts to provide an accurate MAC-level implementation of the 802.11 specification and to provide a not-so-slow PHY-level model of the 802.11a specification and a not-so-slow PHY-level model of the 802.11a/b/g/n specifications.
In ns-3, nodes can have multiple WifiNetDevices on separate channels, and the WifiNetDevice can coexist with other device types; this removes an architectural limitation found in ns-2. Presently, however, there is no model for cross-channel interference or coupling.
The source code for the WifiNetDevice lives in the directory src/wifi.
The implementation is modular and provides roughly four levels of models:
Next, we provide some overview of each layer. More detailed information will be discussed later.
There are presently three MAC high models that provide for the three (non-mesh; the mesh equivalent, which is a sibling of these with common parent ns3::RegularWifiMac, is not discussed here) Wi-Fi topological elements - Access Point (AP) (ns3::ApWifiMac), non-AP Station (STA) (ns3::StaWifiMac), and STA in an Independent Basic Service Set (IBSS - also commonly referred to as an ad hoc network (ns3::AdhocWifiMac).
The simplest of these is ns3::AdhocWifiMac, which implements a Wi-Fi MAC that does not perform any kind of beacon generation, probing, or association. The ns3::StaWifiMac class implements an active probing and association state machine that handles automatic re-association whenever too many beacons are missed. Finally, ns3::ApWifiMac implements an AP that generates periodic beacons, and that accepts every attempt to associate.
These three MAC high models share a common parent in ns3::RegularWifiMac, which exposes, among other MAC configuration, an attribute QosSupported that allows configuration of 802.11e/WMM-style QoS support and an attribute HtSupported that allows configuration of 802.11n High Throughput style support.
The MAC low layer is split into three components:
There are also several rate control algorithms that can be used by the MAC low layer. A complete list of available rate control algorithms is provided in a separate section.
The PHY layer implements a single model in the ns3::WifiPhy class: the physical layer model implemented there is described fully in a paper entitled Yet Another Network Simulator Validation results for 802.11b are available in this technical report
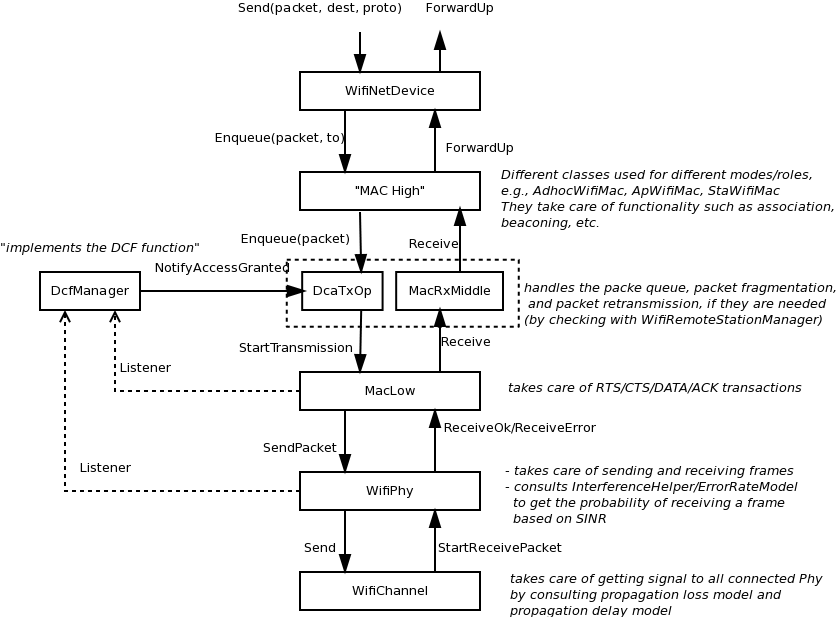
WifiNetDevice architecture.
The modularity provided by the implementation makes low-level configuration of the WifiNetDevice powerful but complex. For this reason, we provide some helper classes to perform common operations in a simple matter, and leverage the ns-3 attribute system to allow users to control the parametrization of the underlying models.
Users who use the low-level ns-3 API and who wish to add a WifiNetDevice to their node must create an instance of a WifiNetDevice, plus a number of constituent objects, and bind them together appropriately (the WifiNetDevice is very modular in this regard, for future extensibility). At the low-level API, this can be done with about 20 lines of code (see ns3::WifiHelper::Install, and ns3::YansWifiPhyHelper::Create). They also must create, at some point, a WifiChannel, which also contains a number of constituent objects (see ns3::YansWifiChannelHelper::Create).
However, a few helpers are available for users to add these devices and channels with only a few lines of code, if they are willing to use defaults, and the helpers provide additional API to allow the passing of attribute values to change default values. Commonly used attribute values are listed in the Attributes section. The scripts in examples/wireless can be browsed to see how this is done. Next, we describe the common steps to create a WifiNetDevice from the bottom layer (WifiChannel) up to the device layer (WifiNetDevice).
To create a WifiNetDevice, users need to configure mainly five steps:
The YansWifiChannelHelper has an unusual name. Readers may wonder why it is named this way. The reference is to the yans simulator from which this model is taken. The helper can be used to create a WifiChannel with a default PropagationLoss and PropagationDelay model.
Users will typically type code such as:
YansWifiChannelHelper wifiChannelHelper = YansWifiChannelHelper::Default ();
Ptr<WifiChannel> wifiChannel = wifiChannelHelper.Create ();
to get the defaults. Specifically, the default is a channel model with a propagation delay equal to a constant, the speed of light (ns3::ConstantSpeedPropagationDelayModel), and a propagation loss based on a default log distance model (ns3::LogDistancePropagationLossModel)), using a default exponent of 3. Please note that the default log distance model is configured with a reference loss of 46.6777 dB at reference distance of 1m. The reference loss of 46.6777 dB was calculated using Friis propagation loss model at 5.15 GHz. The reference loss must be changed if 802.11b, 802.11g or 802.11n (at 2.4 GHz) are used since they operate at 2.4 Ghz.
Note the distinction above in creating a helper object vs. an actual simulation object. In ns-3, helper objects (used at the helper API only) are created on the stack (they could also be created with operator new and later deleted). However, the actual ns-3 objects typically inherit from class ns3::Object and are assigned to a smart pointer. See the chapter in the ns-3 manual for a discussion of the ns-3 object model, if you are not familiar with it.
The following two methods are useful when configuring YansWifiChannelHelper:
Physical devices (base class ns3::WifiPhy) connect to ns3::WifiChannel models in ns-3. We need to create WifiPhy objects appropriate for the YansWifiChannel; here the YansWifiPhyHelper will do the work.
The YansWifiPhyHelper class configures an object factory to create instances of a YansWifiPhy and adds some other objects to it, including possibly a supplemental ErrorRateModel and a pointer to a MobilityModel. The user code is typically:
YansWifiPhyHelper wifiPhyHelper = YansWifiPhyHelper::Default ();
wifiPhyHelper.SetChannel (wifiChannel);
The default YansWifiPhyHelper is configured with NistErrorRateModel (ns3::NistErrorRateModel). You can change the error rate model by calling the YansWifiPhyHelper::SetErrorRateModel method.
Optionally, if pcap tracing is needed, a user may use the following command to enable pcap tracing:
YansWifiPhyHelper::SetPcapDataLinkType (enum SupportedPcapDataLinkTypes dlt)
ns-3 supports RadioTap and Prism tracing extensions for 802.11.
Note that we haven’t actually created any WifiPhy objects yet; we’ve just prepared the YansWifiPhyHelper by telling it which channel it is connected to. The Phy objects are created in the next step.
802.11n PHY layer can use either 20 or 40 MHz channel width, and either long (800 ns) or short (400 ns) OFDM guard intervals. To configure those parameters, the following lines of code could be used (in this example, it configures a 40 MHz channel width with a short guard interval):
wifiPhyHelper.Set (« ChannelBonding,BooleanValue(true));
wifiPhyHelper.Set ("ShortGuardEnabled",BooleanValue(true));
Furthermore, 802.11n provides an optional mode (GreenField mode) to reduce preamble durations and which is only compatible with 802.11n devices. This mode is enabled as follows:
wifiPhyHelper.Set ("GreenfieldEnabled",BooleanValue(true));
The next step is to configure the MAC model. We use WifiMacHelper to accomplish this. WifiMacHelper takes care of both the MAC low model and MAC high model. A user must decide if 802.11/WMM-style QoS and/or 802.11n-style High throughput (HT) support is required.
The ns3::NqosWifiMacHelper and ns3::QosWifiMacHelper configure an object factory to create instances of a ns3::WifiMac. They are used to configure MAC parameters like type of MAC.
The former, ns3::NqosWifiMacHelper, supports creation of MAC instances that do not have 802.11e/WMM-style QoS nor 802.11n-style High throughput (HT) support enabled.
For example the following user code configures a non-QoS and non-HT MAC that will be a non-AP STA in an infrastructure network where the AP has SSID ns-3-ssid:
NqosWifiMacHelper wifiMacHelper = NqosWifiMacHelper::Default ();
Ssid ssid = Ssid ("ns-3-ssid");
wifiMacHelper.SetType ("ns3::StaWifiMac",
                      "Ssid", SsidValue (ssid),
                      "ActiveProbing", BooleanValue (false));
To create MAC instances with QoS support enabled, ns3::QosWifiMacHelper is used in place of ns3::NqosWifiMacHelper.
The following code shows an example use of ns3::QosWifiMacHelper to create an AP with QoS enabled:
QosWifiMacHelper wifiMacHelper = QosWifiMacHelper::Default ();
wifiMacHelper.SetType ("ns3::ApWifiMac",
                       "Ssid", SsidValue (ssid),
                       "BeaconGeneration", BooleanValue (true),
                       "BeaconInterval", TimeValue (Seconds (2.5)));
With QoS-enabled MAC models it is possible to work with traffic belonging to four different Access Categories (ACs): AC_VO for voice traffic, AC_VI for video traffic, AC_BE for best-effort traffic and AC_BK for background traffic. In order for the MAC to determine the appropriate AC for an MSDU, packets forwarded down to these MAC layers should be marked using ns3::QosTag in order to set a TID (traffic id) for that packet otherwise it will be considered belonging to AC_BE.
To create ad-hoc MAC instances, simply use ns3::AdhocWifiMac instead of ns3::StaWifiMac or ns3::ApWifiMac.
The ns3::HtWifiMacHelper configures an object factory to create instances of a ns3::WifiMac. It is used to supports creation of MAC instances that have 802.11n-style High throughput (HT) and QoS support enabled. In particular, this object can be also used to set:
For example the following user code configures a HT MAC that will be a non-AP STA with QoS enabled, aggregation on AC_VO, and Block Ack on AC_BE, in an infrastructure network where the AP has SSID ns-3-ssid:
HtWifiMacHelper wifiMacHelper = HtWifiMacHelper::Default ();
Ssid ssid = Ssid ("ns-3-ssid");
wifiMacHelper.SetType ("ns3::StaWifiMac",
                      "Ssid", SsidValue (ssid),
                      "ActiveProbing", BooleanValue (false));

wifiMacHelper.SetMsduAggregatorForAc (AC_VO, "ns3::MsduStandardAggregator",
                                      "MaxAmsduSize", UintegerValue (3839));
wifiMacHelper.SetBlockAckThresholdForAc (AC_BE, 10);
wifiMacHelper.SetBlockAckInactivityTimeoutForAc (AC_BE, 5);
This object can be also used to set in the same way as ns3::QosWifiMacHelper.
We’re now ready to create WifiNetDevices. First, let’s create a WifiHelper with default settings:
WifiHelper wifiHelper = WifiHelper::Default ();
What does this do? It sets the default wifi standard to 802.11a and sets the RemoteStationManager to ns3::ArfWifiManager. You can change the RemoteStationManager by calling the WifiHelper::SetRemoteStationManager method. To change the wifi standard, call the WifiHelper::SetStandard method with the desired standard.
Now, let’s use the wifiPhyHelper and wifiMacHelper created above to install WifiNetDevices on a set of nodes in a NodeContainer “c”:
NetDeviceContainer wifiContainer = WifiHelper::Install (wifiPhyHelper, wifiMacHelper, c);
This creates the WifiNetDevice which includes also a WifiRemoteStationManager, a WifiMac, and a WifiPhy (connected to the matching WifiChannel).
The WifiHelper::SetStandard method set various default timing parameters as defined in the selected standard version, overwriting values that may exist or have been previously configured. In order to change parameters that are overwritten by WifiHelper::SetStandard, this should be done post-install using Config::Set:
WifiHelper wifi = WifiHelper::Default ();
wifi.SetStandard (WIFI_PHY_STANDARD_80211n_2_4GHZ);
wifi.SetRemoteStationManager ("ns3::ConstantRateWifiManager", "DataMode", StringValue("OfdmRate65MbpsBW20MHz"), "ControlMode", StringValue("OfdmRate6_5MbpsBW20MHz"));
HtWifiMacHelper mac = HtWifiMacHelper::Default ();

//Install PHY and MAC
Ssid ssid = Ssid ("ns3-wifi");
mac.SetType ("ns3::StaWifiMac",
"Ssid", SsidValue (ssid),
"ActiveProbing", BooleanValue (false));

NetDeviceContainer staDevice;
staDevice = wifi.Install (phy, mac, wifiStaNode);

mac.SetType ("ns3::ApWifiMac",
"Ssid", SsidValue (ssid));

NetDeviceContainer apDevice;
apDevice = wifi.Install (phy, mac, wifiApNode);

//Once install is done, we overwrite the standard timing values
Config::Set ("/NodeList/*/DeviceList/*/$ns3::WifiNetDevice/Mac/Slot", TimeValue (MicroSeconds (slot)));
Config::Set ("/NodeList/*/DeviceList/*/$ns3::WifiNetDevice/Mac/Sifs", TimeValue (MicroSeconds (sifs)));
Config::Set ("/NodeList/*/DeviceList/*/$ns3::WifiNetDevice/Mac/AckTimeout", TimeValue (MicroSeconds (ackTimeout)));
Config::Set ("/NodeList/*/DeviceList/*/$ns3::WifiNetDevice/Mac/CtsTimeout", TimeValue (MicroSeconds (ctsTimeout)));
Config::Set ("/NodeList/*/DeviceList/*/$ns3::WifiNetDevice/Mac/Rifs", TimeValue (MicroSeconds (rifs)));
Config::Set ("/NodeList/*/DeviceList/*/$ns3::WifiNetDevice/Mac/BasicBlockAckTimeout", TimeValue (MicroSeconds (basicBlockAckTimeout)));
Config::Set ("/NodeList/*/DeviceList/*/$ns3::WifiNetDevice/Mac/CompressedBlockAckTimeout", TimeValue (MicroSeconds (compressedBlockAckTimeout)));
There are many ns-3 attributes that can be set on the above helpers to deviate from the default behavior; the example scripts show how to do some of this reconfiguration.
Finally, a mobility model must be configured on each node with Wi-Fi device. Mobility model is used for calculating propagation loss and propagation delay. Two examples are provided in the next section. Users are referred to the chapter on Mobility module for detailed information.
We provide two typical examples of how a user might configure a Wi-Fi network – one example with an ad-hoc network and one example with an infrastructure network. The two examples were modified from the two examples in the examples/wireless folder (wifi-simple-adhoc.cc and wifi-simple-infra.cc). Users are encouraged to see examples in the examples/wireless folder.
In this example, we create two ad-hoc nodes equipped with 802.11a Wi-Fi devices. We use the ns3::ConstantSpeedPropagationDelayModel as the propagation delay model and ns3::LogDistancePropagationLossModel with the exponent of 3.0 as the propagation loss model. Both devices are configured with ConstantRateWifiManager at the fixed rate of 12Mbps. Finally, we manually place them by using the ns3::ListPositionAllocator:
std::string phyMode ("OfdmRate12Mbps");

NodeContainer c;
c.Create (2);

WifiHelper wifi;
wifi.SetStandard (WIFI_PHY_STANDARD_80211a);

YansWifiPhyHelper wifiPhy =  YansWifiPhyHelper::Default ();
// ns-3 supports RadioTap and Prism tracing extensions for 802.11
wifiPhy.SetPcapDataLinkType (YansWifiPhyHelper::DLT_IEEE802_11_RADIO);

YansWifiChannelHelper wifiChannel;
wifiChannel.SetPropagationDelay ("ns3::ConstantSpeedPropagationDelayModel");
wifiChannel.AddPropagationLoss ("ns3::LogDistancePropagationLossModel",
                                "Exponent", DoubleValue (3.0));
wifiPhy.SetChannel (wifiChannel.Create ());

// Add a non-QoS upper mac, and disable rate control (i.e. ConstantRateWifiManager)
NqosWifiMacHelper wifiMac = NqosWifiMacHelper::Default ();
wifi.SetRemoteStationManager ("ns3::ConstantRateWifiManager",
                              "DataMode",StringValue (phyMode),
                              "ControlMode",StringValue (phyMode));
// Set it to adhoc mode
wifiMac.SetType ("ns3::AdhocWifiMac");
NetDeviceContainer devices = wifi.Install (wifiPhy, wifiMac, c);

// Configure mobility
MobilityHelper mobility;
Ptr<ListPositionAllocator> positionAlloc = CreateObject<ListPositionAllocator> ();
positionAlloc->Add (Vector (0.0, 0.0, 0.0));
positionAlloc->Add (Vector (5.0, 0.0, 0.0));
mobility.SetPositionAllocator (positionAlloc);
mobility.SetMobilityModel ("ns3::ConstantPositionMobilityModel");
mobility.Install (c);

// other set up (e.g. InternetStack, Application)
This is a typical example of how a user might configure an access point and a set of clients. In this example, we create one access point and two clients. Each node is equipped with 802.11b Wi-Fi device:
std::string phyMode ("DsssRate1Mbps");

NodeContainer ap;
ap.Create (1);
NodeContainer sta;
sta.Create (2);

WifiHelper wifi;
wifi.SetStandard (WIFI_PHY_STANDARD_80211b);

YansWifiPhyHelper wifiPhy =  YansWifiPhyHelper::Default ();
// ns-3 supports RadioTap and Prism tracing extensions for 802.11
wifiPhy.SetPcapDataLinkType (YansWifiPhyHelper::DLT_IEEE802_11_RADIO);

YansWifiChannelHelper wifiChannel;
// reference loss must be changed since 802.11b is operating at 2.4GHz
wifiChannel.SetPropagationDelay ("ns3::ConstantSpeedPropagationDelayModel");
wifiChannel.AddPropagationLoss ("ns3::LogDistancePropagationLossModel",
                                "Exponent", DoubleValue (3.0),
                                "ReferenceLoss", DoubleValue (40.0459));
wifiPhy.SetChannel (wifiChannel.Create ());

// Add a non-QoS upper mac, and disable rate control
NqosWifiMacHelper wifiMac = NqosWifiMacHelper::Default ();
wifi.SetRemoteStationManager ("ns3::ConstantRateWifiManager",
                              "DataMode",StringValue (phyMode),
                              "ControlMode",StringValue (phyMode));

// Setup the rest of the upper mac
Ssid ssid = Ssid ("wifi-default");
// setup ap.
wifiMac.SetType ("ns3::ApWifiMac",
                 "Ssid", SsidValue (ssid));
NetDeviceContainer apDevice = wifi.Install (wifiPhy, wifiMac, ap);
NetDeviceContainer devices = apDevice;

// setup sta.
wifiMac.SetType ("ns3::StaWifiMac",
                 "Ssid", SsidValue (ssid),
                 "ActiveProbing", BooleanValue (false));
NetDeviceContainer staDevice = wifi.Install (wifiPhy, wifiMac, sta);
devices.Add (staDevice);

// Configure mobility
MobilityHelper mobility;
Ptr<ListPositionAllocator> positionAlloc = CreateObject<ListPositionAllocator> ();
positionAlloc->Add (Vector (0.0, 0.0, 0.0));
positionAlloc->Add (Vector (5.0, 0.0, 0.0));
positionAlloc->Add (Vector (0.0, 5.0, 0.0));
mobility.SetPositionAllocator (positionAlloc);
mobility.SetMobilityModel ("ns3::ConstantPositionMobilityModel");
mobility.Install (ap);
mobility.Install (sta);

// other set up (e.g. InternetStack, Application)
The WifiChannel subclass can be used to connect together a set of ns3::WifiNetDevice network interfaces. The class ns3::WifiPhy is the object within the WifiNetDevice that receives bits from the channel. For the channel propagation modeling, the propagation module is used; see section Propagation for details.
This section summarizes the description of the BER calculations found in the yans paper taking into account the Forward Error Correction present in 802.11a and describes the algorithm we implemented to decide whether or not a packet can be successfully received. See “Yet Another Network Simulator” for more details.
The PHY layer can be in one of five states:
When the first bit of a new packet is received while the PHY is not IDLE (that is, it is already synchronized on the reception of another earlier packet or it is sending data itself), the received packet is dropped. Otherwise, if the PHY is IDLE or CCA Busy, we calculate the received energy of the first bit of this new signal and compare it against our Energy Detection threshold (as defined by the Clear Channel Assessment function mode 1). If the energy of the packet k is higher, then the PHY moves to RX state and schedules an event when the last bit of the packet is expected to be received. Otherwise, the PHY stays in IDLE or CCA Busy state and drops the packet.
The energy of the received signal is assumed to be zero outside of the reception
interval of packet k and is calculated from the transmission power with a
path-loss propagation model in the reception interval. where the path loss
exponent,  , is chosen equal to
  , the reference distance,
 is choosen equal to
  and the reference energy is based
based on a Friis propagation model.
and the reference energy is based
based on a Friis propagation model.
When the last bit of the packet upon which the PHY is synchronized is received, we need to calculate the probability that the packet is received with any error to decide whether or not the packet on which we were synchronized could be successfully received or not: a random number is drawn from a uniform distribution and is compared against the probability of error.
To evaluate the probability of error, we start from the piecewise linear functions shown in Figure SNIR function over time. and calculate the SNIR function.
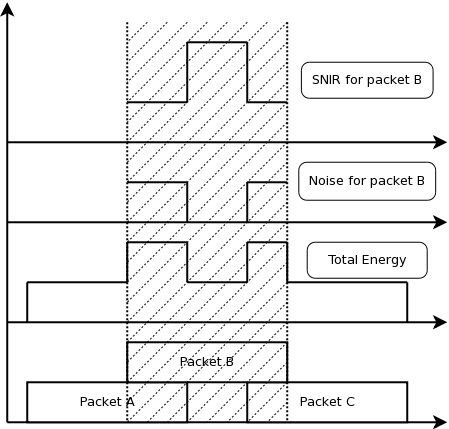
SNIR function over time.
From the SNIR function we can derive the Bit Error Rate (BER) and Packet Error Rate (PER) for the modulation and coding scheme being used for the transmission. Please refer to [pei80211ofdm], [pei80211b], [lacage2006yans], [Haccoun] and [Frenger] for a detailed description of the available BER/PER models.
The WifiChannel implementation uses the propagation loss and delay models provided within the ns-3 Propagation module.
The 802.11 Distributed Coordination Function is used to calculate when to grant access to the transmission medium. While implementing the DCF would have been particularly easy if we had used a recurring timer that expired every slot, we chose to use the method described in [ji2004sslswn] where the backoff timer duration is lazily calculated whenever needed since it is claimed to have much better performance than the simpler recurring timer solution.
The backoff procedure of DCF is described in section 9.2.5.2 of [ieee80211].
Thus, if the queue is empty, a newly arrived packet should be transmitted immediately after channel is sensed idle for DIFS. If queue is not empty and after a successful MPDU that has no more fragments, a node should also start the backoff timer.
Some users have observed that the 802.11 MAC with an empty queue on an idle channel will transmit the first frame arriving to the model immediately without waiting for DIFS or backoff, and wonder whether this is compliant. According to the standard, “The backoff procedure shall be invoked for a STA to transfer a frame when finding the medium busy as indicated by either the physical or virtual CS mechanism.” So in this case, the medium is not found to be busy in recent past and the station can transmit immediately.
The higher-level MAC functions are implemented in a set of other C++ classes and deal with:
Multiple rate control algorithms are available in ns-3. Some rate control algorithms are modeled after real algorithms used in real devices; others are found in literature. The following rate control algorithms can be used by the MAC low layer:
Algorithms found in real devices:
Algorithms in literature:
The constant rate control algorithm always uses the same transmission mode for every packet. Users can set a desired ‘DataMode’ for all ‘unicast’ packets and ‘ControlMode’ for all ‘request’ control packets (e.g. RTS).
To specify different data mode for non-unicast packets, users must set the ‘NonUnicastMode’ attribute of the WifiRemoteStationManager. Otherwise, WifiRemoteStationManager will use a mode with the lowest rate for non-unicast packets.
The 802.11 standard is quite clear on the rules for selection of transmission parameters for control response frames (e.g. CTS and ACK). ns-3 follows the standard and selects the rate of control response frames from the set of basic rates or mandatory rates. This means that control response frames may be sent using different rate even though the ConstantRateWifiManager is used. The ControlMode attribute of the ConstantRateWifiManager is used for RTS frames only. The rate of CTS and ACK frames are selected according to the 802.11 standard. However, users can still manually add WifiMode to the basic rate set that will allow control response frames to be sent at other rates. Please consult the project wiki on how to do this.
Available attributes:
The ideal rate control algorithm selects the best mode according to the SNR of the previous packet sent. Consider node A sending a unicast packet to node B. When B successfully receives the packet sent from A, B records the SNR of the received packet into a ns3::SnrTag and adds the tag to an ACK back to A. By doing this, A is able to learn the SNR of the packet sent to B using an out-of-band mechanism (thus the name ‘ideal’). A then uses the SNR to select a transmission mode based on a set of SNR thresholds, which was built from a target BER and mode-specific SNR/BER curves.
Available attribute:
The minstrel rate control algorithm is a rate control algorithm originated from madwifi project. It is currently the default rate control algorithm of the Linux kernel.
Minstrel keeps track of the probability of successfully sending a frame of each available rate. Minstrel then calculates the expected throughput by multiplying the probability with the rate. This approach is chosen to make sure that lower rates are not selected in favor of the higher rates (since lower rates are more likely to have higher probability).
In minstrel, roughly 10 percent of transmissions are sent at the so-called lookaround rate. The goal of the lookaround rate is to force minstrel to try higher rate than the currently used rate.
For a more detailed information about minstrel, see [linuxminstrel].
Modifying the default wifi model is one of the common tasks when performing research. We provide an overview of how to make changes to the default wifi model in this section. Depending on your goal, the common tasks are (in no particular order):
supported * rate control algorithms are not aware of HT rates; they will only use the 802.11a BSSBasicRateSet when 802.11n is configured
Should link to the list of traces exported by Doxygen
| [ieee80211] | (1, 2) IEEE Std 802.11-2007 Wireless LAN Medium Access Control (MAC) and Physical Layer (PHY) Specifications |
| [pei80211b] | G. Pei and Tom Henderson, Validation of ns-3 802.11b PHY model |
| [pei80211ofdm] | G. Pei and Tom Henderson, Validation of OFDM error rate model in ns-3 |
| [lacage2006yans] | M. Lacage and T. Henderson, Yet another Network Simulator |
| [Haccoun] | D. Haccoun and G. Begin, High-Rate Punctured Convolutional Codes for Viterbi Sequential Decoding, IEEE Transactions on Communications, Vol. 32, Issue 3, pp.315-319. |
| [Frenger] | Pâl Frenger et al., “Multi-rate Convolutional Codes”. |
| [ji2004sslswn] | Z. Ji, J. Zhou, M. Takai and R. Bagrodia, Scalable simulation of large-scale wireless networks with bounded inaccuracies, in Proc. of the Seventh ACM Symposium on Modeling, Analysis and Simulation of Wireless and Mobile Systems, October 2004. |
| [linuxminstrel] | minstrel linux wireless |
| [lacage2004aarfamrr] | (1, 2) M. Lacage, H. Manshaei, and T. Turletti, IEEE 802.11 rate adaptation: a practical approach, in Proc. 7th ACM International Symposium on Modeling, Analysis and Simulation of Wireless and Mobile Systems, 2004. |
| [kim2006cara] | J. Kim, S. Kim, S. Choi, and D. Qiao, CARA: Collision-Aware Rate Adaptation for IEEE 802.11 WLANs, in Proc. 25th IEEE International Conference on Computer Communications, 2006 |
| [wong2006rraa] | S. Wong, H. Yang, S. Lu, and V. Bharghavan, Robust Rate Adaptation for 802.11 Wireless Networks, in Proc. 12th Annual International Conference on Mobile Computing and Networking, 2006 |
| [maguolo2008aarfcd] | F. Maguolo, M. Lacage, and T. Turletti, Efficient collision detection for auto rate fallback algorithm, in IEEE Symposium on Computers and Communications, 2008 |
| [akella2007parf] | A. Akella, G. Judd, S. Seshan, and P. Steenkiste, ‘Self-management in chaotic wireless deployments’, in Wireless Networks, Kluwer Academic Publishers, 2007, 13, 737-755. http://www.cs.odu.edu/~nadeem/classes/cs795-WNS-S13/papers/enter-006.pdf |
| [chevillat2005aparf] | Chevillat, P.; Jelitto, J., and Truong, H. L., ‘Dynamic data rate and transmit power adjustment in IEEE 802.11 wireless LANs’, in International Journal of Wireless Information Networks, Springer, 2005, 12, 123-145. http://www.cs.mun.ca/~yzchen/papers/papers/rate_adaptation/80211_dynamic_rate_power_adjustment_chevillat_j2005.pdf |