Difference between revisions of "HOWTO configure Eclipse with ns-3"
From Nsnam
(waf builder configuration update, screenshot added) |
|||
| Line 1: | Line 1: | ||
| − | + | == Configure Mercurial == | |
| − | + | ||
| − | + | * First download eclipse IDE for C++ developers from http://www.eclipse.org | |
| − | + | * Install eclipse into you operating system | |
| − | + | * Install mercurial eclipse plugin: | |
| − | + | ** Go to help->software update | |
| − | + | ** Click on available software | |
| − | + | ** Click on add a site | |
| − | + | ** Add http://www.vectrace.com/eclipse-update/ taken from http://www.vectrace.com/mercurialeclipse/ then click on mercurialeclipse and check the box and click on install | |
| − | + | * We suppose that you already have mercurial installed on your machine | |
| − | + | * start eclipse, it will create a workspace directory NB:It is advised to use a different directory for the code say ~/src | |
| − | + | * clone the mercurial reppository: go to ~/src and execute hg clone http://code.nsnam.org/ns-3-dev ns3dev | |
| − | + | * create a new empty C++ project with your preferred name and the path is ~/src/ns3devt on | |
| − | + | * click right on the project and go to team->share project | |
| + | * click on next and click on use local hg and finish | ||
| + | |||
You should have now your project configured with eclipse and be able to pull, update, view history, etc in eclipse. The next steps will allow you to configure, compile and run the code from eclipse. | You should have now your project configured with eclipse and be able to pull, update, view history, etc in eclipse. The next steps will allow you to configure, compile and run the code from eclipse. | ||
| − | Configure | + | == Configure Waf Builder == |
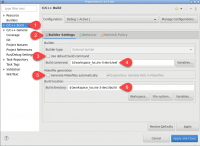
| − | + | [[File:Builder-settings.png|200px|thumb|right|Builder Settings Screenshot]] | |
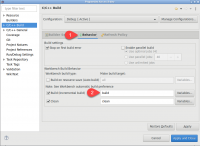
| − | + | [[File:Builder-behaviour.png|200px|thumb|right|Builder Behaviour Screenshot]] | |
| − | + | * Click right on the project and click on properties | |
| − | + | * Click on C/C++ build and configure the builder | |
| − | + | * Uncheck the box Use default build command | |
| − | + | * Uncheck the box Generate makefile automatically | |
| − | + | * Write ${workspace_loc:/ns3dev}/waf in the build command | |
| − | + | * Make sure your build directory is the build directory in ns3dev (${workspace_loc:/ns3dev/build}) | |
| − | + | * Click on the behaviour tab | |
| + | * Remove the `all` option in front of the build checkbox and write `build` | ||
| + | * Now when you click on build you will be able to build the project using waf | ||
| + | |||
| + | == Configure Debugger == | ||
| + | '''TODO''' | ||
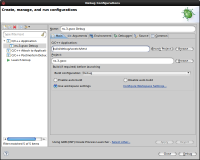
| − | [[ | + | [[File:Debug-main.png|200px|thumb|left|Debugger main tab]] |
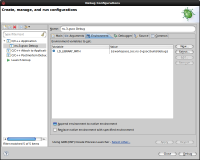
| + | [[File:Debug-env.png|200px|thumb|left|Debugger environment tab]] | ||
Revision as of 09:58, 1 July 2010
Configure Mercurial
- First download eclipse IDE for C++ developers from http://www.eclipse.org
- Install eclipse into you operating system
- Install mercurial eclipse plugin:
- Go to help->software update
- Click on available software
- Click on add a site
- Add http://www.vectrace.com/eclipse-update/ taken from http://www.vectrace.com/mercurialeclipse/ then click on mercurialeclipse and check the box and click on install
- We suppose that you already have mercurial installed on your machine
- start eclipse, it will create a workspace directory NB:It is advised to use a different directory for the code say ~/src
- clone the mercurial reppository: go to ~/src and execute hg clone http://code.nsnam.org/ns-3-dev ns3dev
- create a new empty C++ project with your preferred name and the path is ~/src/ns3devt on
- click right on the project and go to team->share project
- click on next and click on use local hg and finish
You should have now your project configured with eclipse and be able to pull, update, view history, etc in eclipse. The next steps will allow you to configure, compile and run the code from eclipse.
Configure Waf Builder
- Click right on the project and click on properties
- Click on C/C++ build and configure the builder
- Uncheck the box Use default build command
- Uncheck the box Generate makefile automatically
- Write ${workspace_loc:/ns3dev}/waf in the build command
- Make sure your build directory is the build directory in ns3dev (${workspace_loc:/ns3dev/build})
- Click on the behaviour tab
- Remove the `all` option in front of the build checkbox and write `build`
- Now when you click on build you will be able to build the project using waf
Configure Debugger
TODO


