HOWTO configure Eclipse with ns-3: Difference between revisions
m (moved HOWTO configure eclipse with ns-3 to HOWTO configure Eclipse with ns-3: Wrong capitalization) |
(→Miscellaneous tips: Added subsection "Clearing Eclipse errors" following ns-3-users post entitled "configure eclipse for NS3.26") |
||
| Line 95: | Line 95: | ||
This tip is for [[Ubuntu Linux]] distributions. The paths might be different | This tip is for [[Ubuntu Linux]] distributions. The paths might be different | ||
for other distributions. | for other distributions. | ||
In a terminal write the following: | |||
* In a terminal write the following: '''pkg-config --cflags libxml-2.0''' | |||
* Copy the output. (For example: ''' -I/usr/include/libxml2''' ) | |||
* Right-click your CDT project and select 'Properties'. | |||
* Expand 'C/C++ General' and select 'Paths and Symbols'. | |||
* Select 'GNU C++' under Languages | |||
* Click 'Add' to define new element | |||
* Write in the Directory field what was the output of the pkg-config command without the -I prefix i.e: '''/usr/include/libxml2''' | |||
* Re-build the ns-3 project. | |||
--[[User:Loulloudes.n|Nicholas Loulloudes]] 03:16, 30 December 2011 (EST) | --[[User:Loulloudes.n|Nicholas Loulloudes]] 03:16, 30 December 2011 (EST) | ||
=== Clearing Eclipse errors === | |||
This tip has been suggested on the user forum. It aims at clearing errors reported by Eclipse even though the project builds and runs correctly (according to waf). | |||
* Right-click your CDT project and select 'Properties'. | |||
* Expand 'C/C++ General' and select 'Paths and Symbols'. | |||
* Select 'GNU C++' under Languages | |||
* Click 'Add' to define new element | |||
* Browse the 'Workspace...' and select the '''build''' directory of your CDT project (it should be recognized as a workspace path) | |||
* Re-build the ns-3 project | |||
* Re-build the index of the project (by right-clicking your CDT project and selecting 'Index' then 'Rebuild'). | |||
If errors are still displayed in the project directory tree, open the concerned files to clear them. | |||
Revision as of 12:03, 21 September 2017
Configure Mercurial
- First download eclipse IDE for C++ developers from http://www.eclipse.org
- Install eclipse into you operating system
- Install mercurial eclipse plugin:
- Go to help->software update
- Click on available software
- Click on add a site
- Add http://cbes.javaforge.com/update (taken from http://javaforge.com/project/HGE) then click on mercurialeclipse and check the box and click on install
- We suppose that you already have mercurial installed on your machine
- start eclipse, it will create a workspace directory in your user's directory named "workspace". You can choose whatever you want but it is advised to use a directory just for the Eclipse projects. Eclipse will put invisible files there and moving the projects from one place to another might be a pain. Mine is in ~/Development/workspace, others prefer ~/src/workspace. You choose your.
- clone the mercurial reppository: go to ~/src and execute hg clone http://code.nsnam.org/ns-3-dev ns-3-dev
- create a new empty C++ project with your preferred name and the path is ~/src/ns-3-dev on
- click right on the project and go to team->share project
- click on next and click on use local hg and finish
You should have now your project configured with eclipse and be able to pull, update, view history, etc in eclipse. The next steps will allow you to configure, compile and run the code from eclipse.
Configure Waf Builder
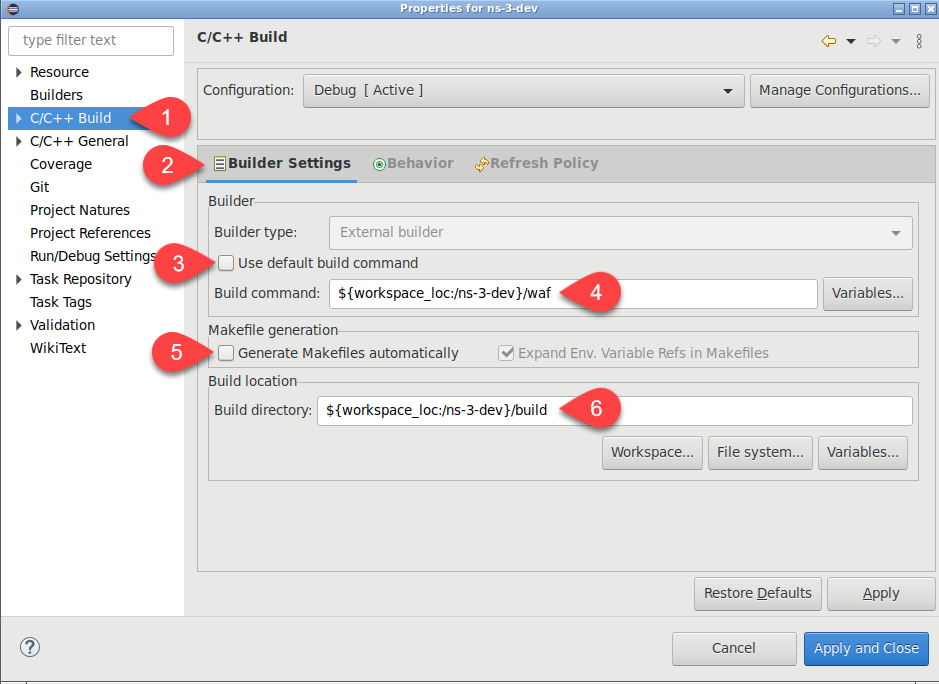
- Click right on the project and click on properties
- Click on C/C++ build and configure the builder
- Uncheck the box Use default build command
- Uncheck the box Generate makefile automatically
- Write ${workspace_loc:ns-3-dev}/waf in the build command
- Make sure your build directory is the build directory in ns-3-dev (${workspace_loc:ns-3-dev})
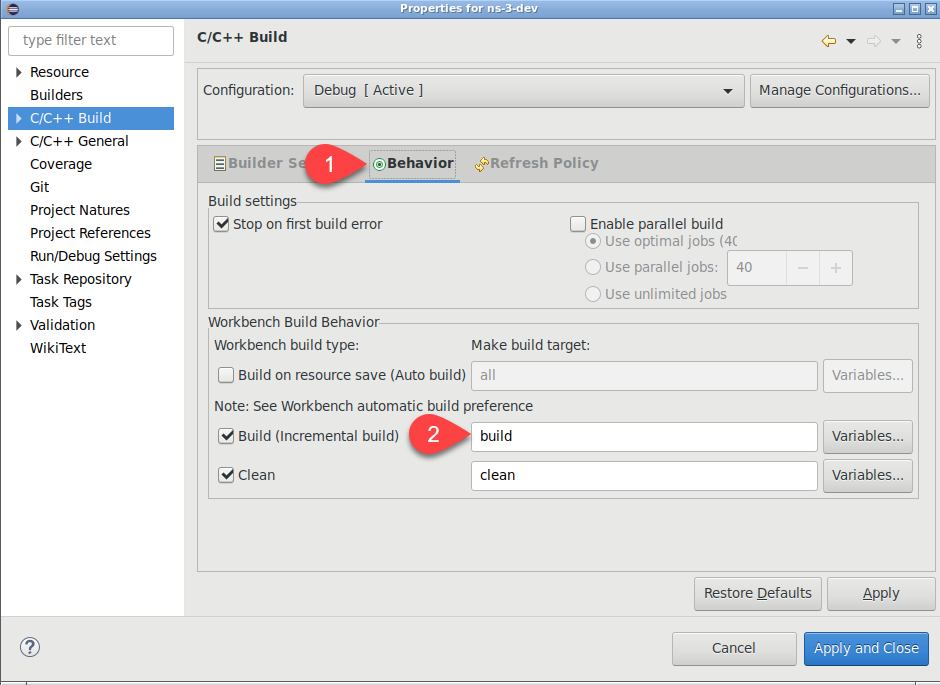
- Click on the behaviour tab
- Remove the `all` option in front of the build checkbox and write `build`
- Now when you click on build you will be able to build the project using waf
Configure Debugger
Suppose you want to debug a test application called "test" under the scratch folder. Here are the steps:
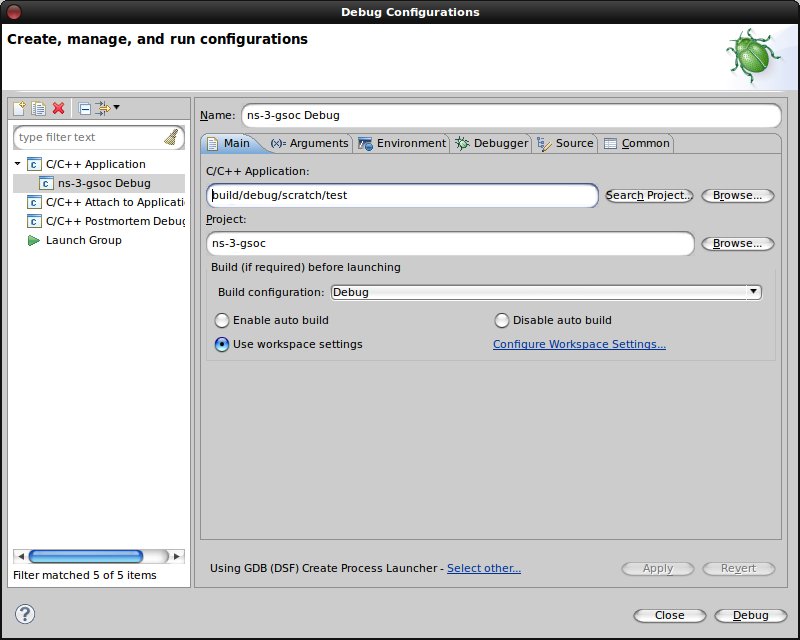
- Click on the "Debug Configurations" option under the "Run" menu
- Create a new configuration and choose a name for it
- Click on the "Browse" button under the "Project" section and select the project
- Click on the "Search Project" button under the "C/C++ Application" section and type the name of the application (test in our case)
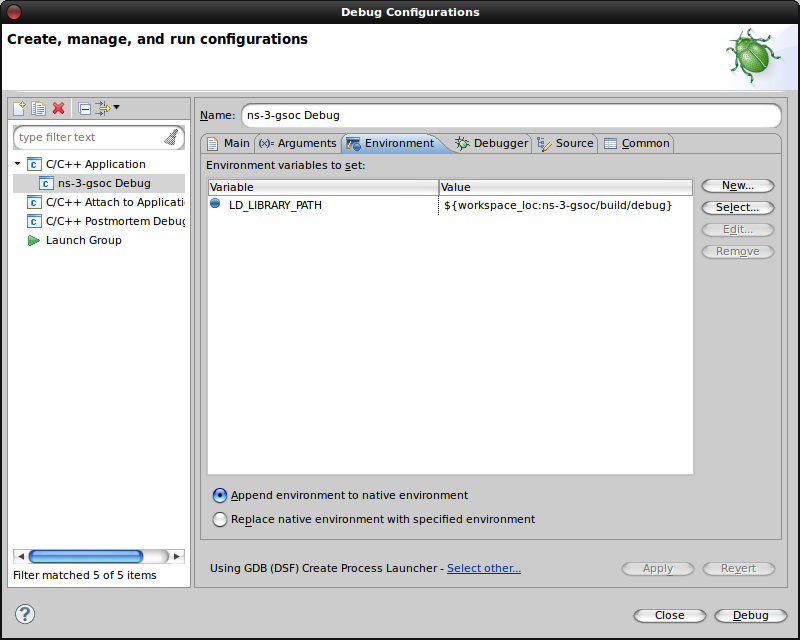
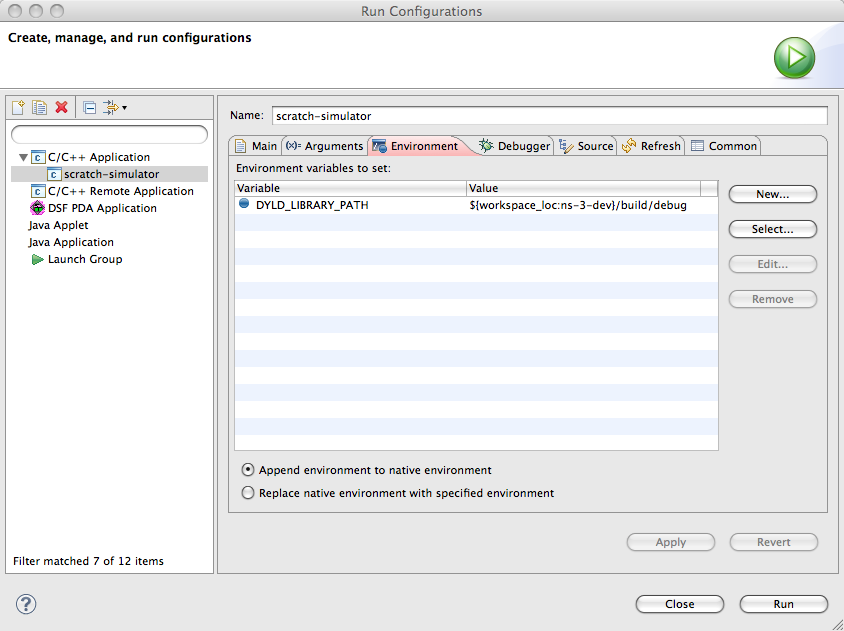
- Go into the "Environment" tab and click on "New" to create a new variable
- Type under the Name field "LD_LIBRARY_PATH" (or "DYLD_LIBRARY_PATH" if you are on a MacOSX)
- Type under the Value field "${workspace_loc:ns-3-dev}/build"
- Be sure the "Append environment to native environment" is selected
- Click on Apply and on Debug if you want to immediately debug the application
--Socket 09:06, 26 January 2011 (UTC)
Configure To Run From Eclipse
Reproduced from Mihal Brumbulli's notes
Several readers note they use the second method.
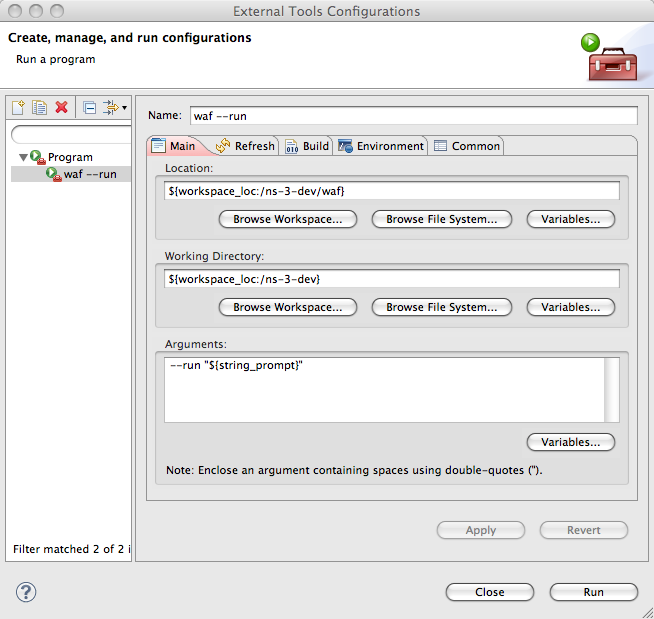
Configure External Runner
- Add an external builder (Run->External Tools->External Tools Configuration) and add a new Program. Then you can configure it:
- Location = your waf location (i.e. /home/x/workspace/ns-3-dev/waf)
- Working Directory = your ns3 directory (i.e. /home/x/workspace/ns-3-dev/)
- Arguments = --run "${string_prompt}"
- Then you can run your program (with arguments) with the new created external builder.
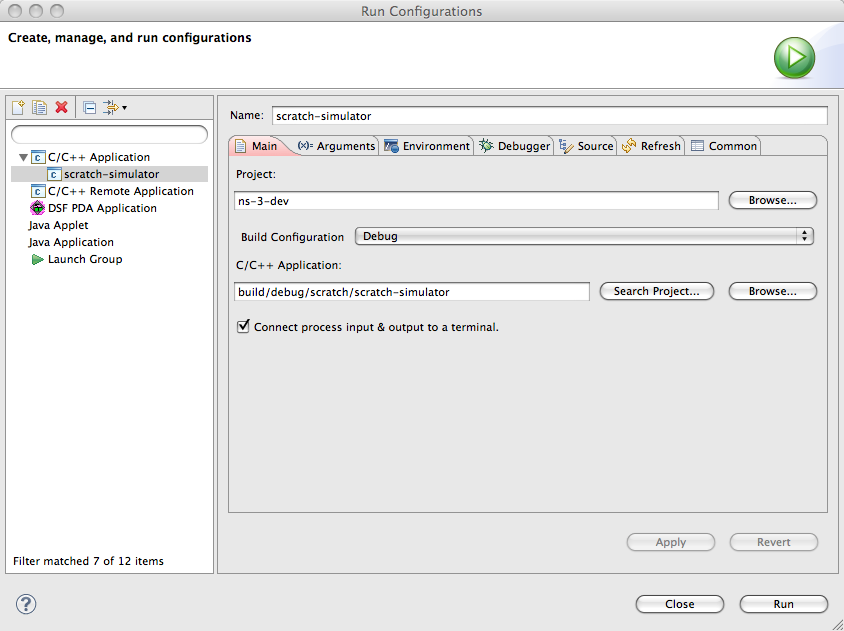
Configure Runner
- You can run any binary generated directly as a C++ Application (normal run command).
- Run -> Run Configuration
- Add a new C/C++ Application
- Name = application name
- On the Main tab:
- Project = your project, or click on Browse to select from the available projects
- C/C++ Application: click Browse to find it in the build tree
- On the Environment tab, create the LD_LIBRARY_PATH variable as above
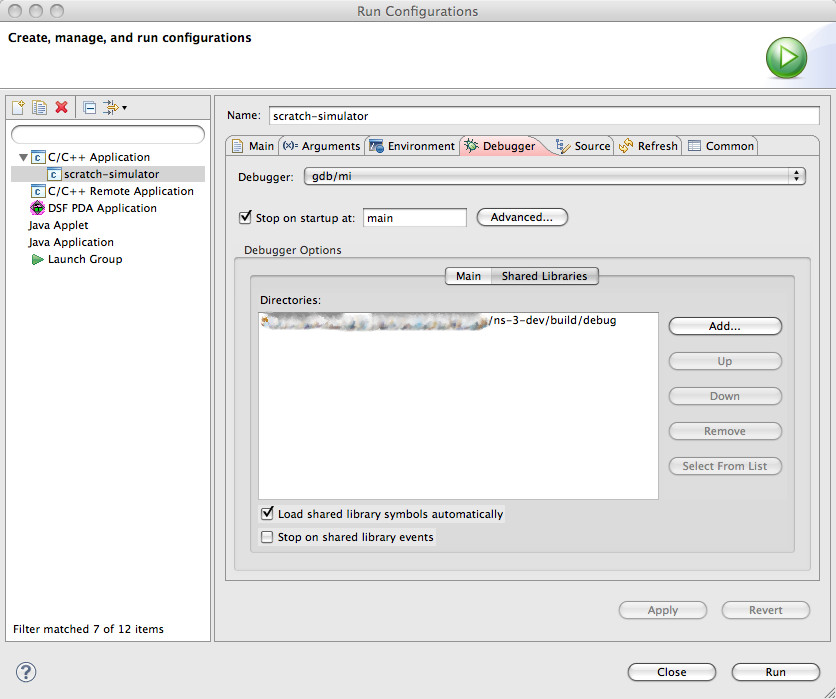
- On the Debugger tab, Shared Library tab, Add the build/debug directory, so all the libraries can be loaded.
--Pdbarnes 19:23, 17 June 2011 (EDT)
Miscellaneous tips
Adding libxml2 include paths and symbols
This tip is for Ubuntu Linux distributions. The paths might be different for other distributions.
- In a terminal write the following: pkg-config --cflags libxml-2.0
- Copy the output. (For example: -I/usr/include/libxml2 )
- Right-click your CDT project and select 'Properties'.
- Expand 'C/C++ General' and select 'Paths and Symbols'.
- Select 'GNU C++' under Languages
- Click 'Add' to define new element
- Write in the Directory field what was the output of the pkg-config command without the -I prefix i.e: /usr/include/libxml2
- Re-build the ns-3 project.
--Nicholas Loulloudes 03:16, 30 December 2011 (EST)
Clearing Eclipse errors
This tip has been suggested on the user forum. It aims at clearing errors reported by Eclipse even though the project builds and runs correctly (according to waf).
- Right-click your CDT project and select 'Properties'.
- Expand 'C/C++ General' and select 'Paths and Symbols'.
- Select 'GNU C++' under Languages
- Click 'Add' to define new element
- Browse the 'Workspace...' and select the build directory of your CDT project (it should be recognized as a workspace path)
- Re-build the ns-3 project
- Re-build the index of the project (by right-clicking your CDT project and selecting 'Index' then 'Rebuild').
If errors are still displayed in the project directory tree, open the concerned files to clear them.
