RoutesMobilityModel
Main Page - Roadmap - Summer Projects - Project Ideas - Developer FAQ - Tools - Related Projects
HOWTOs - Installation - Troubleshooting - User FAQ - Samples - Models - Education - Contributed Code - Papers
Overview


Mobility trace generation in ns-3 is done either by using the Mobility module included in NS-3 or by importing mobility traces generated by third party programs in a compatible format. The Mobility module included in ns-3 gives programmers the building blocks to create simple or complex traces, but is hindered by the fact that creating complex traces using the current module alone takes too long, even for simulations with just a couple of mobility capable nodes. As for mobility traces generated by third party programs, such as SUMO, they can involve too much work for their generation, especially when the researcher's interest - and expertise - is more on the data communication than on the traffic simulation. Using the Google Maps API it is possible to generate complex mobility traces, simply by providing a start and end point.
The RoutesMobilityModel generates realistic mobility traces by querying the Google Maps Directions API and requesting directions between two (or more) points. The information obtained from the Google Maps services, used in tandem with the ns3::WaypointMobilityModel, allows the simulator to generate realistic mobility traces based on real-world locations and road networks. The purpose of this module is to bridge the gap between the highly complex but realistic SUMO and the synthetic mobility models available in ns-3.
This module was developed during the Summer Mentorship Program of 2014.
The RoutesMobilityModel module relies on the module ns3::WaypointMobilityModel in order to import the mobility routes retrieved from the external information services. Our module creates ns3::Waypoints that model the routes used to travel between two (or more) real world locations, and later on they are interpreted as the waypoints the vehicles move through during the simulation.
The Google Maps Directions service provides an XML that contains the following concepts:
- Leg - A Leg is a list of Steps. Legs only occur if the user specifies a Waypoint (A to B, passing through C)
- Step - A Step contains Points encoded in a polyline
- Point - A latitude/longitude set
The information retrieved from the Google Maps Directions API contains, among other information, a polyline for each step of the route requested. It also contains the duration (the time it would take to go from the beginning to the end) for the step. The module decodes the polyline, thus creating a list of geographical coordinates, which are, in turn, converted to Cartesian coordinates. In order to model the speed of a node, implemented by setting the times for the ns3::Waypoints, we distributed the duration of the step in proportion to the distance traveled between two waypoints.
This module empowers the user to generate realistic mobility traces for entire node containers, using different transportation methods (driving, walking, cycling and public transportation), with little to no effort.

The image above depicts a simple use case of this module, the generation of mobility trace for a single node.
The module described in this page provides an interface to convert information from a travel planning service. Currently, only the Google Maps services are implemented however the module was built in order to accommodate different travel planning services, such as OpenStreetMaps, and locations databases. To this end, the Strategy software design pattern was used in the module design.
Documentation
This module has been documented using Doxygen and UML. The UML diagrams for the current release are shown below. Additional documentation was created using sphynx, which documents the module in further detail. This documentation will be available in the ns-3 models documentation once the module is released.
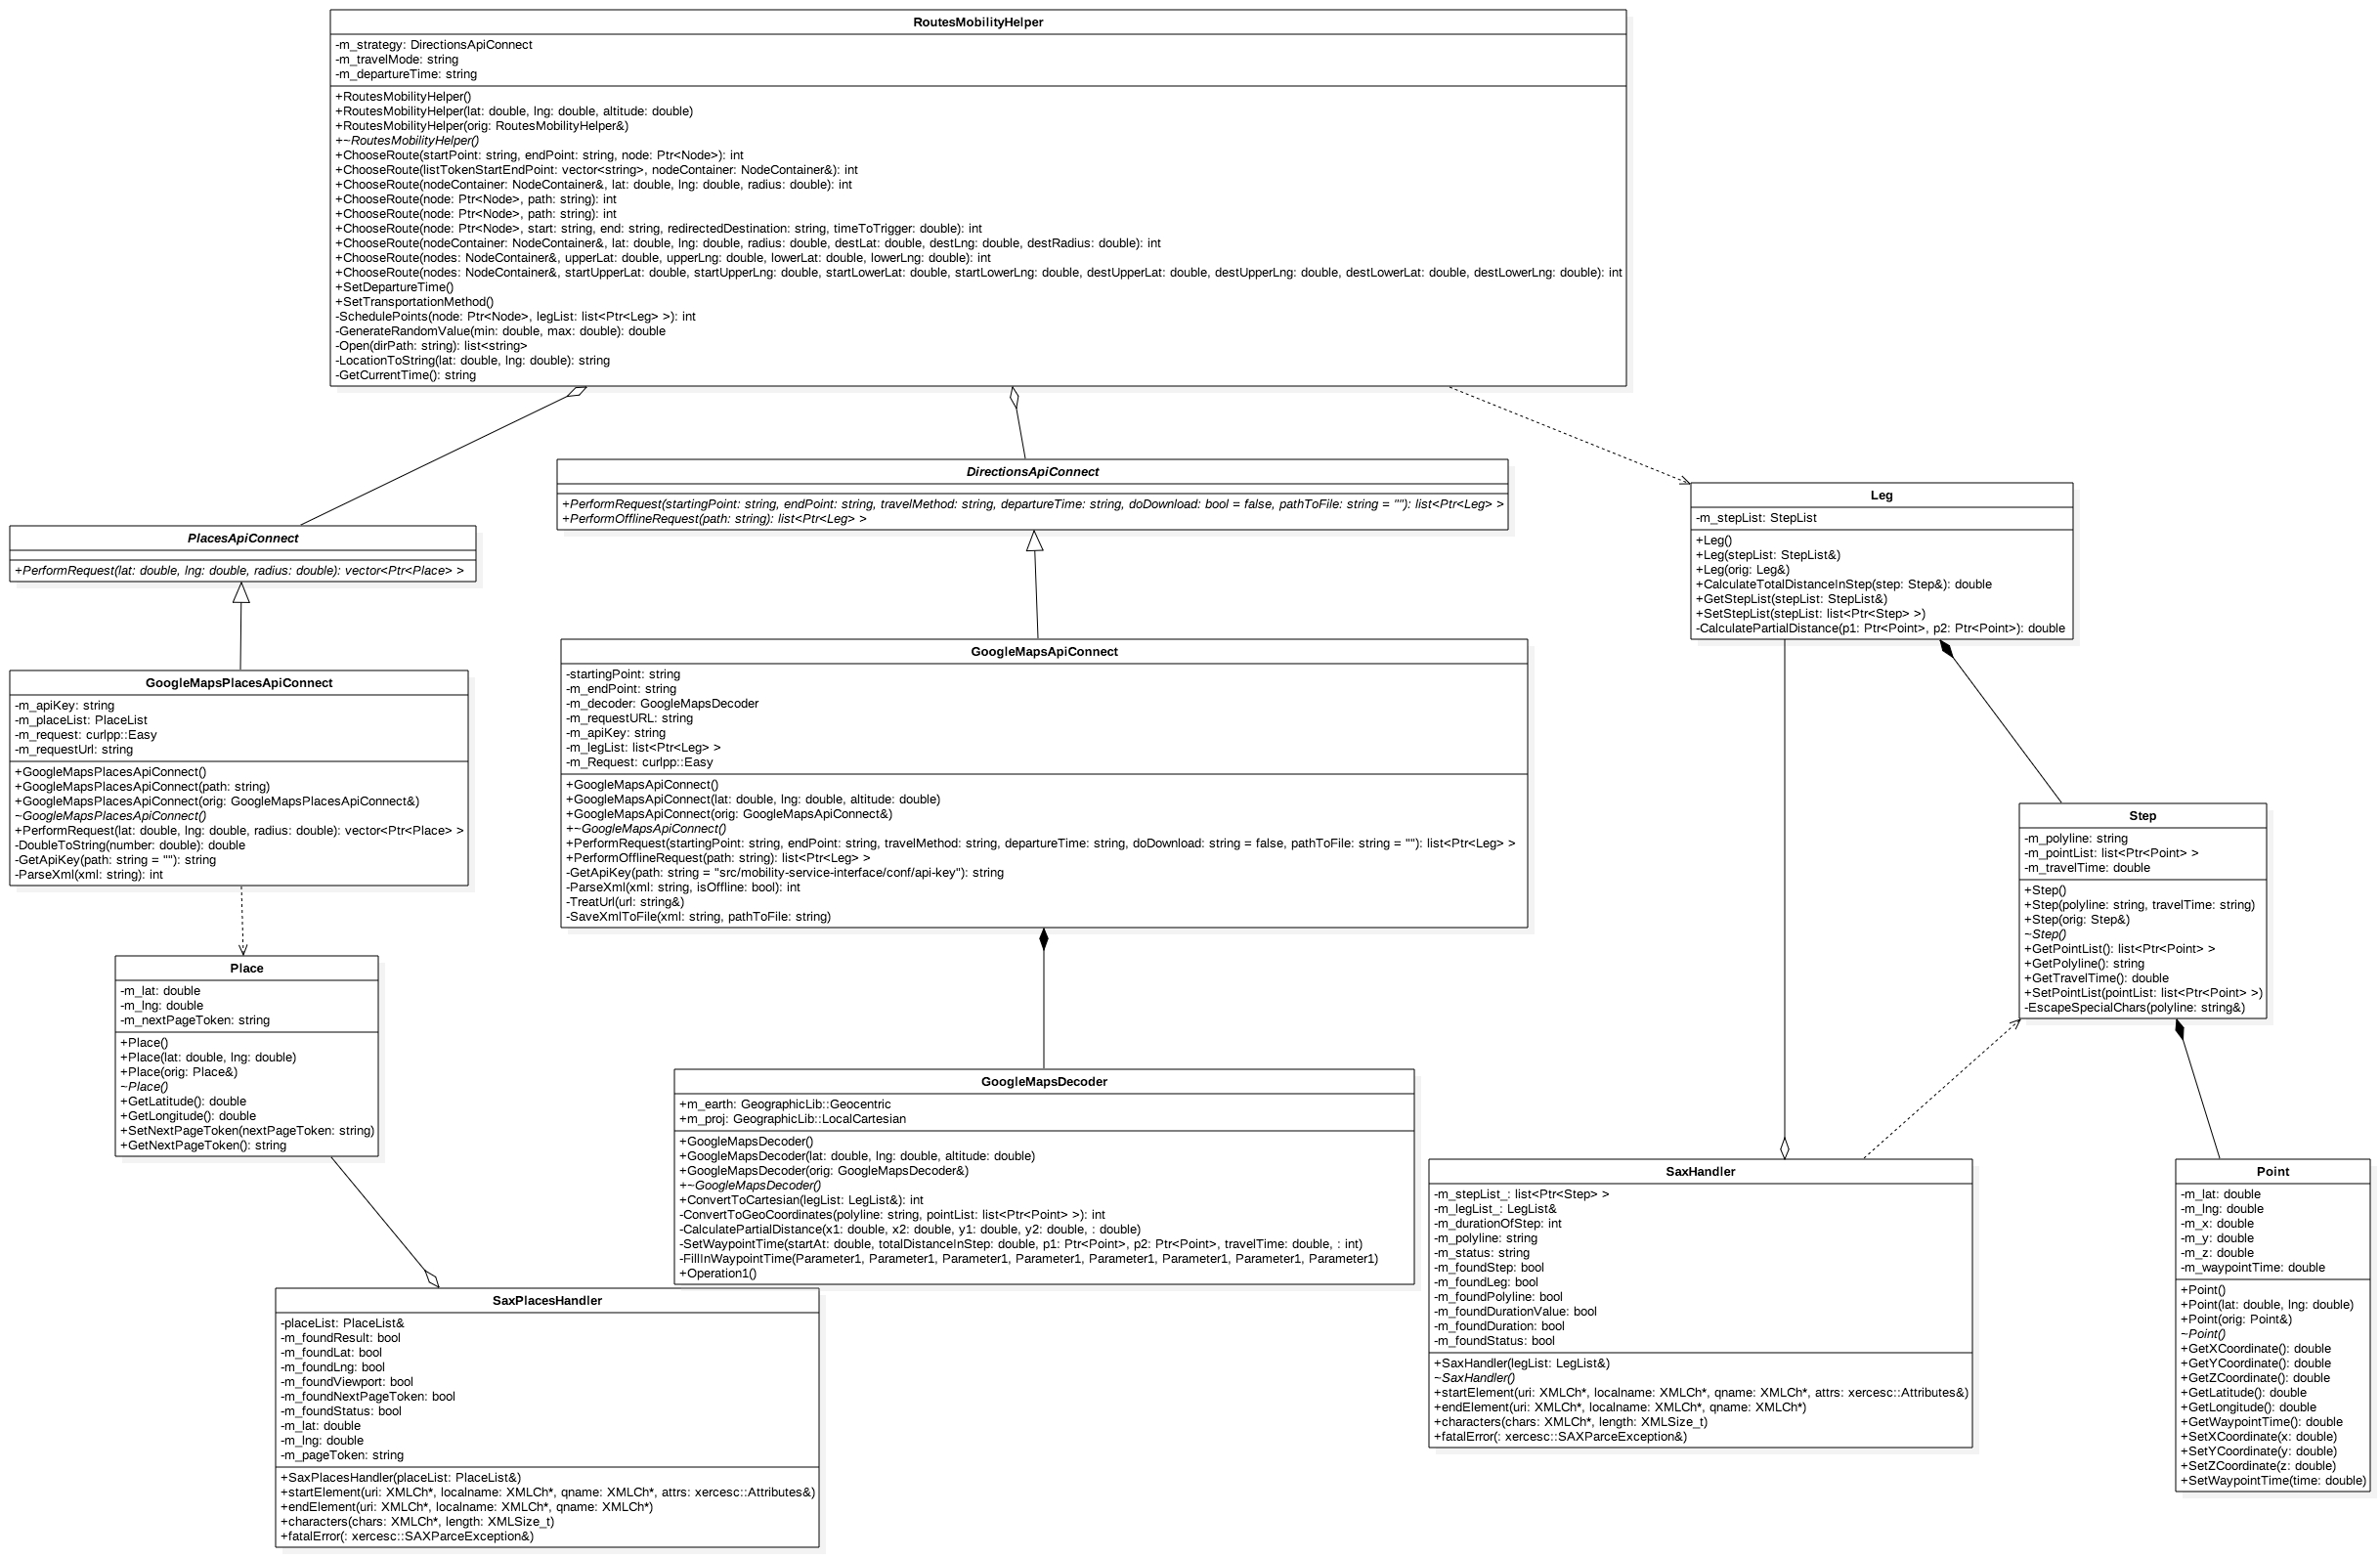
Class diagram
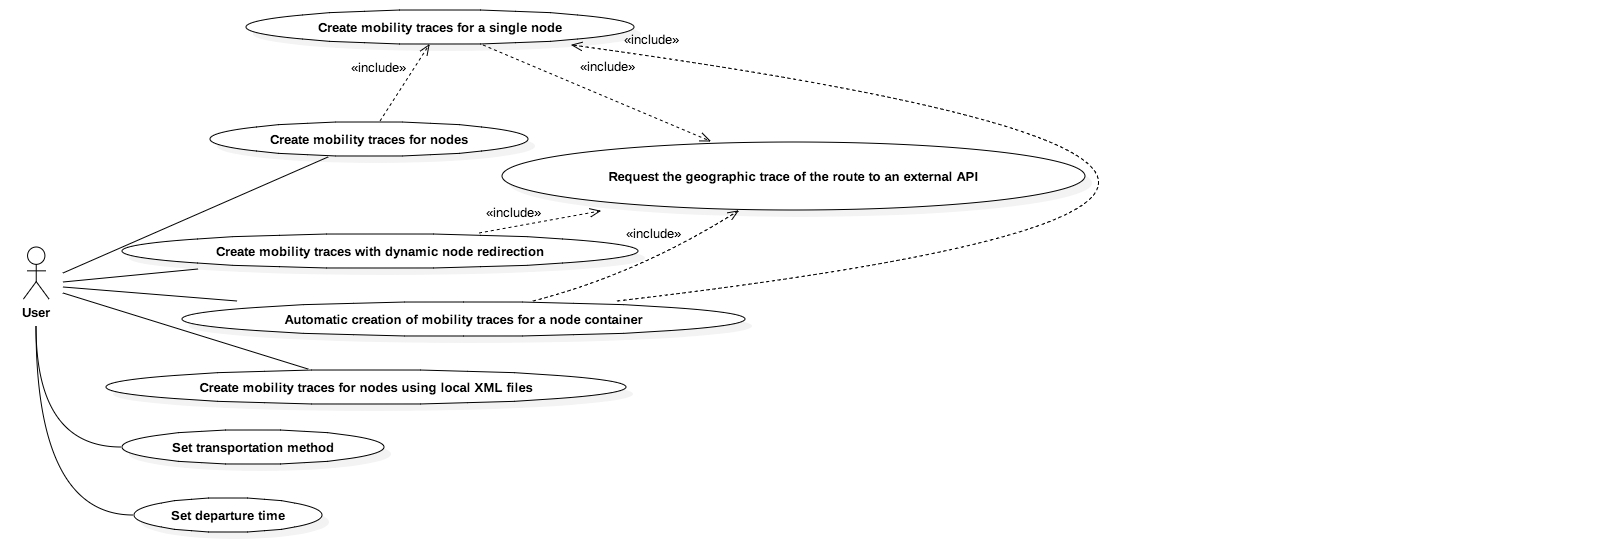
Use Case diagram
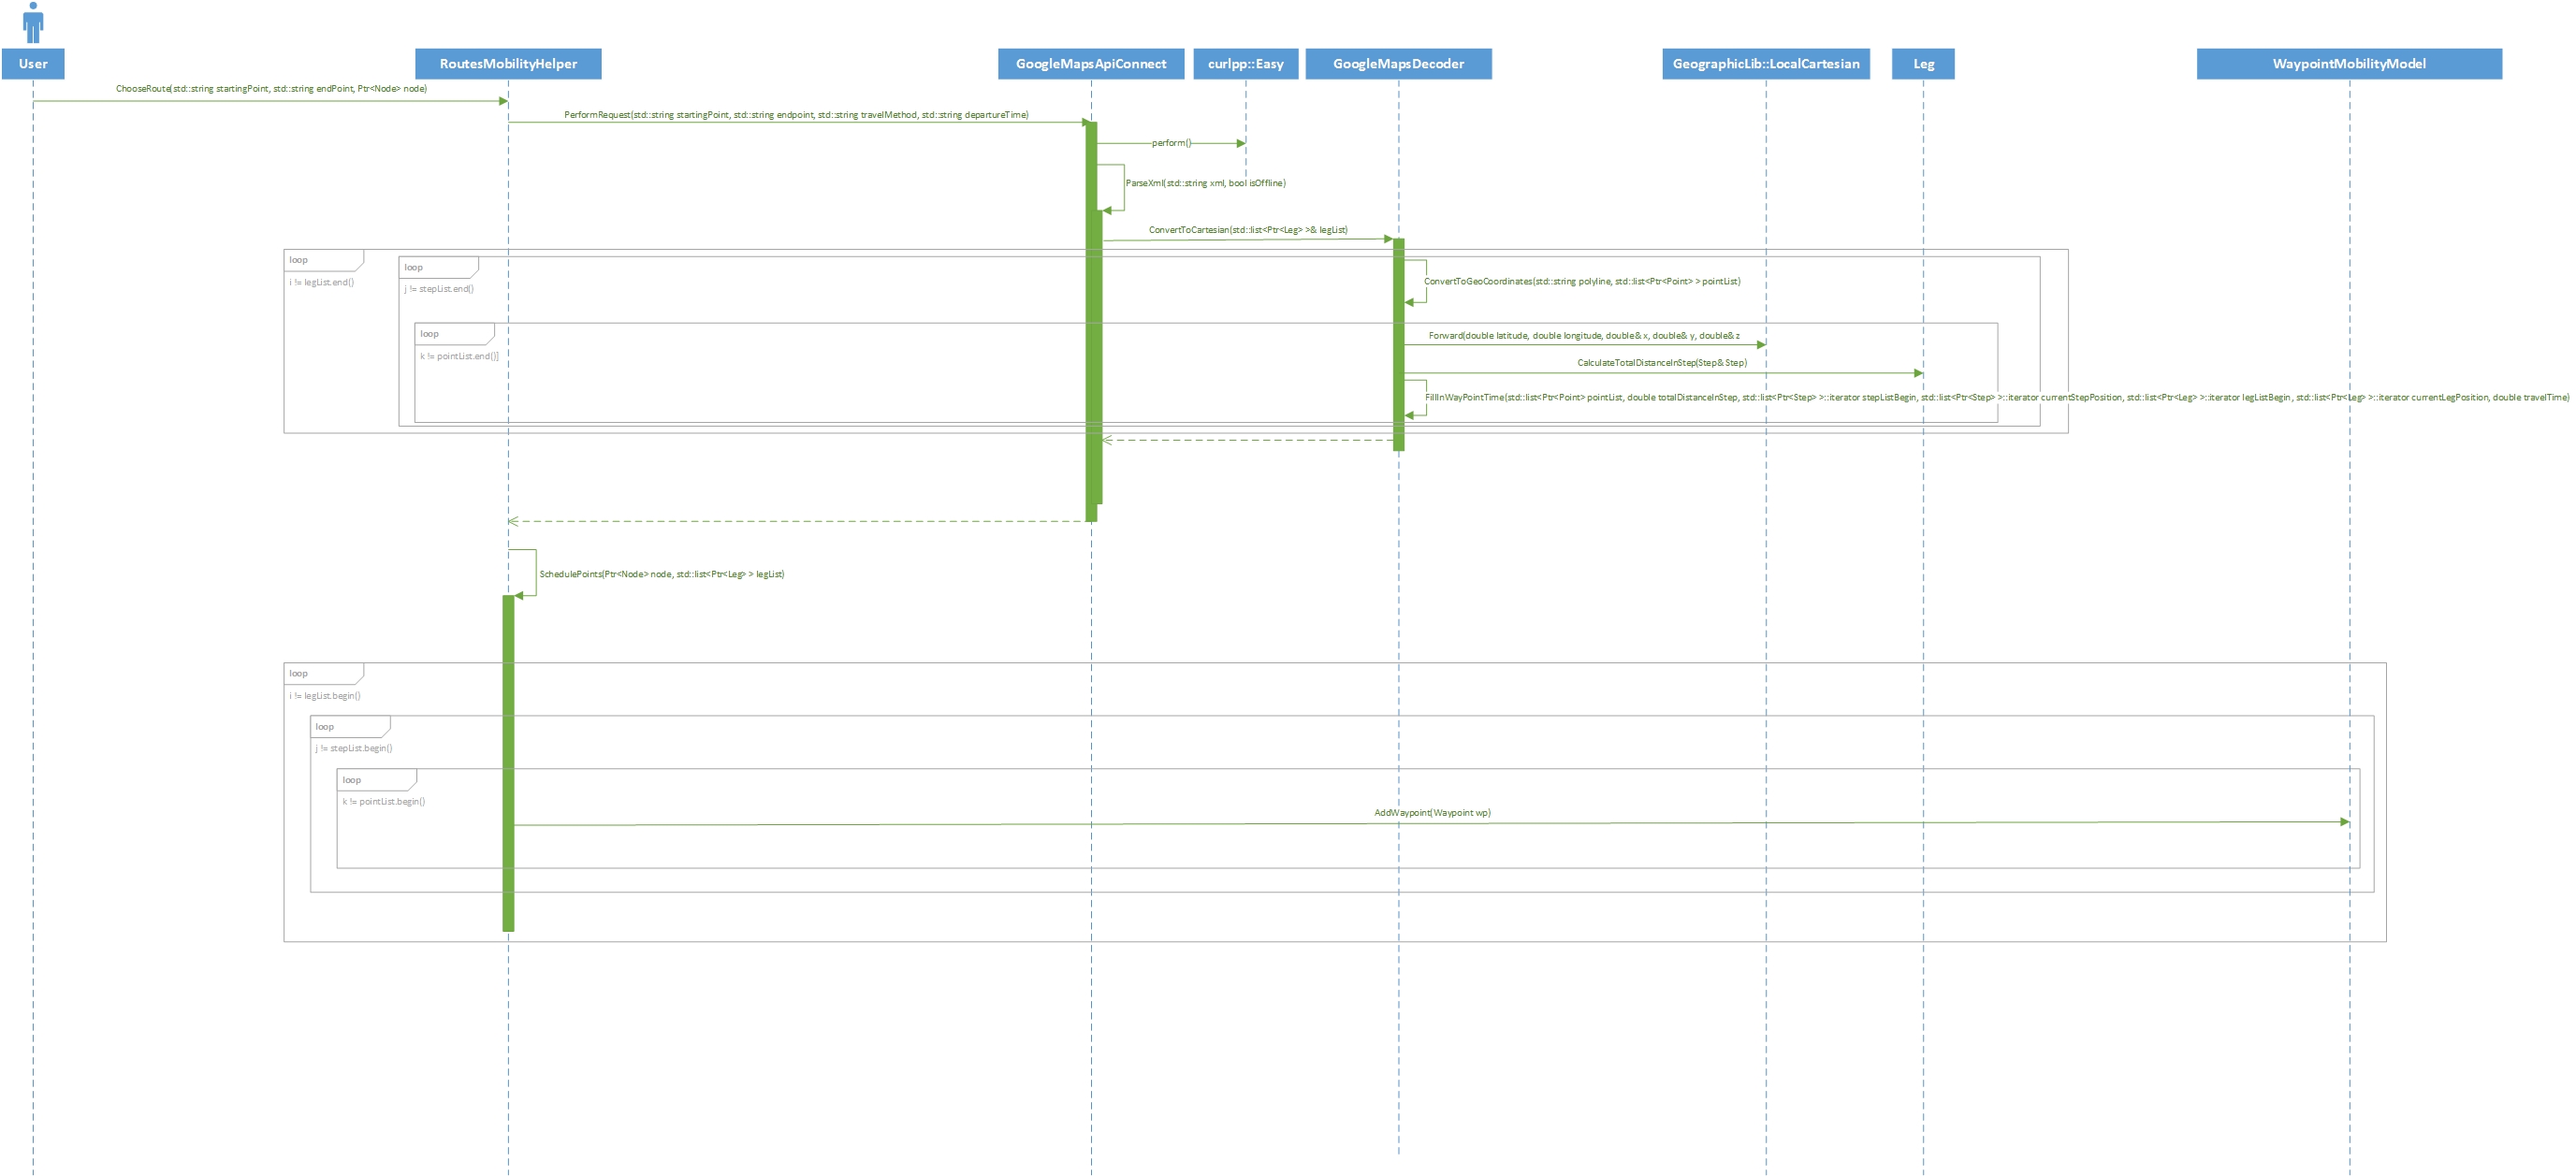
Sequence diagram for the "Create mobility trace for a single node" use case
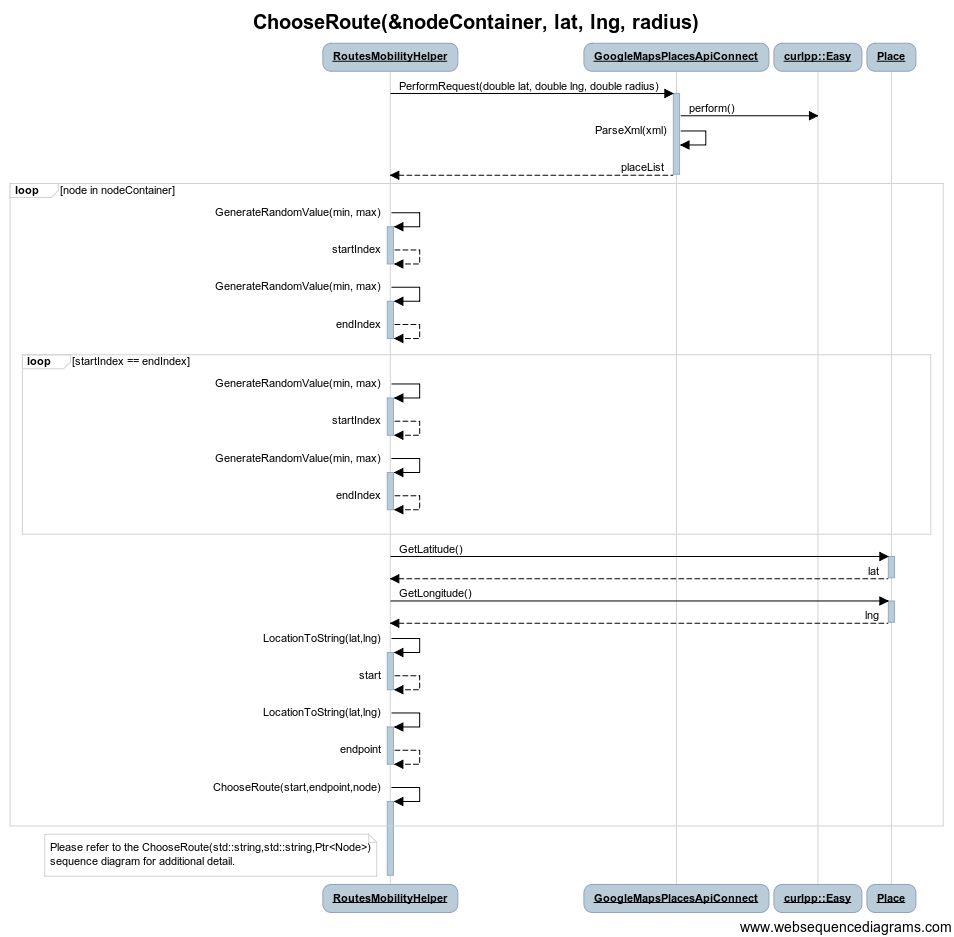
Sequence diagram for the "Automatic creation of mobility traces for a node container" use case


.png)
Code repository
My code can be found here: https://bitbucket.org/TiagoCerqueira/routesmobilitymodel . This includes a ready-to-use version of ns-3.23 with my module.
Additionally, the user can also download a stable release of the module. To use it, the user must then copy the folder to the src/ folder of ns-3.
Current implementation
Features
- Capable of generating mobility for single nodes or for entire node containers without size restriction
- Allows the user to select different methods of transportation for the mobility traces (driving, walking, cycling and public transportation
- Allows the user to specify a departure time
- Is capable of generating mobility online, by contacting the Google Maps API, or offline, by importing cached responses in the filesystem. The Google Maps APIs ToS states that the users must not cache the response data for more than 30 days. Doing so is a direct violation of the ToS
Limitations
This module possesses a couple of limitations:
- Currently, no proper serialization is implemented and, hence, it's not possible to run the exact same mobility between simulations
- The module takes a long time to parse XML responses. This effect is only felt when dealing with large node containers (300+ nodes).
- No bidirectional coupling between data layer and the mobility, which means that the data communications do not affect the mobility
- Traffic information is only available with the paid version of the Google Maps Places API
Dependencies
This module is dependent of the following libraries:
- libcurlpp
- Xerces-C++
- GeographicLib
Tests
In order to provide the users with a reliable module, the team developed a test case to test for the time placement of waypoints and the conversion between geographical and cartesian coordinates. The code is available in the examples folder of the module.
Examples
Three examples are provided, available under the examples folder of the module:
- routes-mobility-example.cc - This example illustrates basic usage of this module, generating mobility for a few nodes
- routes-automatic-example.cc - This example shows the user how to generate mobility for entire node containers, by specifying a real-world area to generate mobility.
- routes-offline-example.cc - This example illustrates how a user can load travel planning information previously downloaded.
Installing the RoutesMobilityModel
This tutorial is concerned with the installation of the RoutesMobilityModel and its dependencies in a ns-3 installation. The steps described in the tutorial were successfully applied to ns-3.23 and ns-3.24.1.
The RoutesMobilityModel depends on curlpp, xerces-cpp and GeographicLib. If the Linux distribution offers packages for these libraries, as is the case for example in Ubuntu, it is sufficient to install the three packages, and it is possible to skip directly to the last step.
The first step, whose commands depend on the Linux distribution in use, regard the installation of packages needed to compile curlpp, xerces-cpp and GeographicLib. The packages to be installed are:
 autoconf
 libtool
 libboost-dev
 libcurl4-openssl-dev
The next step is to install the GeographicLib. This is the library responsible for performing the conversions between Geographical coordinates and Cartesian coordinates
 wget http://downloads.sourceforge.net/project/geographiclib/distrib/GeographicLib-1.44.tar.gz
 tar xvfz GeographicLib-1.44.tar.gz
 ./configure
 make
 sudo make install
After that we need to install the curlpp library, which is responsible for querying the Google Maps APIs, through HTTP.
  wget https://github.com/jpbarrette/curlpp/archive/v0.7.3.tar.gz -O curlpp_v0.7.3
  tar xvfz curlpp_v0.7.3
  ./autogen.sh
  ./configure
  make
  sudo make install
Finally, it's time to install the xerces-cpp library, which is the library responsible for parsing the XML responses from Google
  wget http://mirrors.fe.up.pt/pub/apache//xerces/c/3/sources/xerces-c-3.1.2.tar.gz
  tar xvfz xerces-c-3.1.2.tar.gz
  ./configure
  make
  sudo make install
Afterwards, the compiled libraries have to be added to the "path": Add these two lines to ~/.bashrc (or ~/.bash_profile, in some distributions).
  LD_LIBRARY_PATH=$LD_LIBRARY_PATH:/usr/local/lib:/usr/lib:/usr/lib/x86_64-linux-gnu/
  export LD_LIBRARY_PATH;
In some distributions, the paths may vary slightly. The user should first run the ldconfig command, in order to determine where the libraries are installed. For example: ldconfig -p | grep $(LIBRARY) Finally, for the changes to take effect, the user should run:
source ~/.bashrc (or source ~/.bash_profile)
Installation of the RoutesMobilityModel module itself:
If the system does not have a working ns-3 installation, it is necessary to download and uncompress it, creating for example a "ns-3.24" directory.
Download the module from the project's repository (https://bitbucket.org/TiagoCerqueira/routesmobilitymodel) and move it to ns-3's src/ folder:
  wget https://bitbucket.org/TiagoCerqueira/routesmobilitymodel/downloads/mobility-service-interface.tar.gz
  tar xvfz mobility-service-interface.tar.gz
  mv mobility-service-interface.tar.gz ns-3.24/src
Since the module uses the Google Maps APIs to compute the node's path, the user must provide a valid API key. It's easy to do and free, for basic usage. Detailed instructions are provided with the module's documentation, in the file mobility-service-interface/doc/mobility-service-interface.rst Afterwards, we add the API key to the file mobility-service-interface/conf/api-key.txt (create if necessary).
Finally, it's a matter of configure/build/run an example:
  ./waf configure --enable-examples
  ./waf build
  ./waf --run mobility-service-interface/examples/routes-mobility-example
Future Work
- Implementation of proper serialization is one of the team's top priorities and should be included in the next release. This will empower users to repeat simulations using the same mobility.
- Implementing bidirectional coupling is another goal of the team, however, it will require further study to implement.
Further Reading
- T. Cerqueira, M. Albano, “RoutesMobilityModel: easy realistic mobility simulation using external information services”, Workshop on ns-3 (WNS3 ‘15), May 13th, 2015, pp. 40-46, Castelldefels, Spain. DOI: 10.1145/2756509.2756515. A draft version of the paper can be found here
- The Doxygen and module documentation
- WNS3 2015 presentation slides
- SummerMentorshipProgram page